7 Using the Rule Manager
This topic describes the use of rules to guard against fraudulent activity.
All data from the Thredd Apex platform is checked against a set of predefined rules and logic designed to identify patterns of fraudulent card activity. Any suspicious transactions or events trigger an immediate alert along with an action, such as the blocking of a card.
The rules are the conditions (described as logical expressions) through which transaction verification happens. Rules are tailored to your particular institution.
7.1 Viewing Rules
To see a list of current rules:
-
On the main menu’s navigation pane, go to Rule manager > Rule manager.
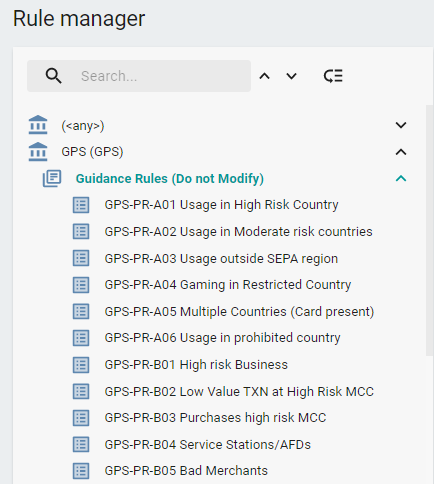
Figure 23: Rule Manager
-
Click on a rule to display more information about it in the right-hand pane:
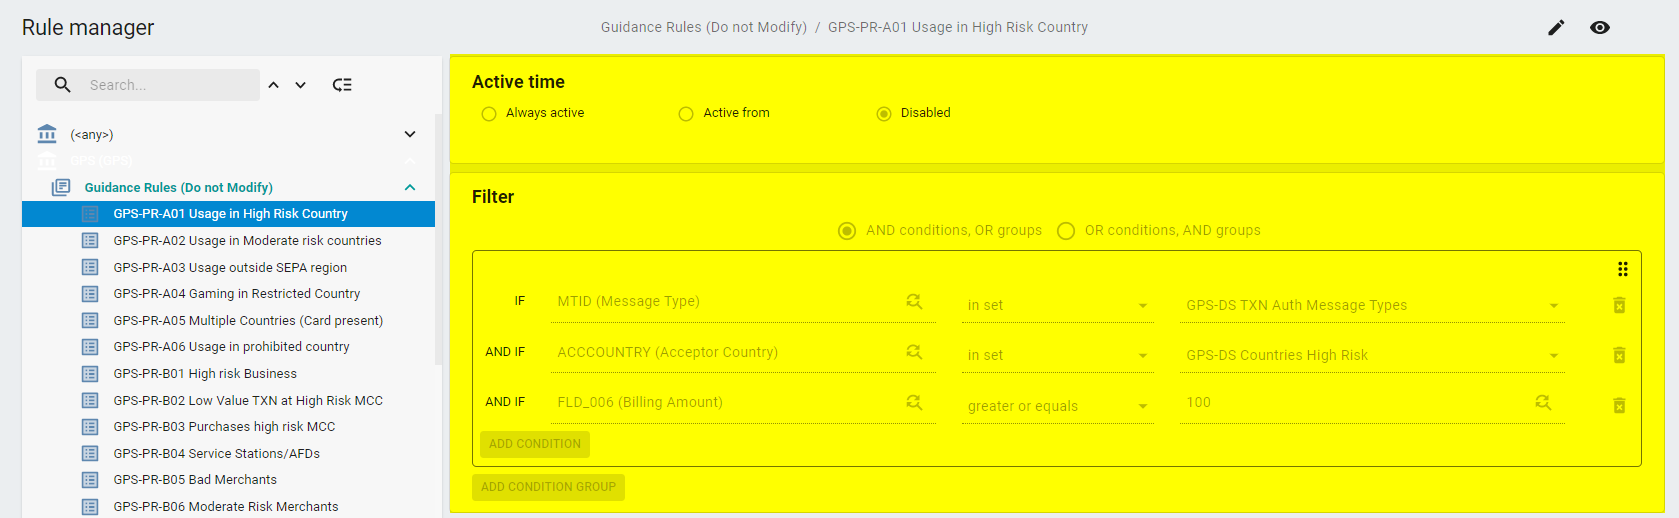
Figure 24: Displaying rule details
7.2 Understanding Rule Conditions and Groups
A rule condition (also called a filter) is a logical expression used by Thredd Protect to determine whether transactions meet the eligibility criteria for triggering an action such as an alert or blocking a card.
You define a rule condition by specifying the left and right part of the expression and a chosen operator in the middle. Typically, the left part of the expression specifies transactional attributes such as Acceptor Country, MCC (Merchant Category Code), etc. The right part usually contains values such as constants or lists of values (known as datasets — see Using Datasets).
The rule condition is evaluated using the chosen operator in the middle of the expression. Depending on what operator is selected, Thredd Protect checks whether the selected attribute on the left of the expression (e.g. Acceptor Country of incoming transactions) “equals”, “not equals”, is “in set” (is part of a list/a dataset), is “not in set” (is not part of a certain list/dataset), etc. as per the right side of the condition.
Example rule condition
To define a condition that filters transactions over 100 in value, specify:
-
on the left-hand side, the attribute Billing Amount
-
on the right-hand side, the value ‘100’
-
in the middle, the operator “greater than”
If Billing amount greater than 100
This ensures that only incoming transactions over the value of 100 satisfy the condition.
For information about configuring the action that will result when the conditions of the rule are met, see About Rule Actions.
7.2.1 About condition groups
A rule can have one or more conditions. When using multiple conditions, you can form one or multiple groups of conditions. For a rule to trigger an action, all the logical expressions/conditions must be satisfied. For example, if a rule has three conditions but only two are satisfied when evaluating an incoming transaction, the rule will not trigger an action.
You can group the conditions associated with rules using AND and OR operators.
You can choose from two options at the top of the Filter pane:
-
AND conditions, OR groups — between groups of conditions the logical operator OR is applied, but the AND operator is applied between conditions within each conditions group
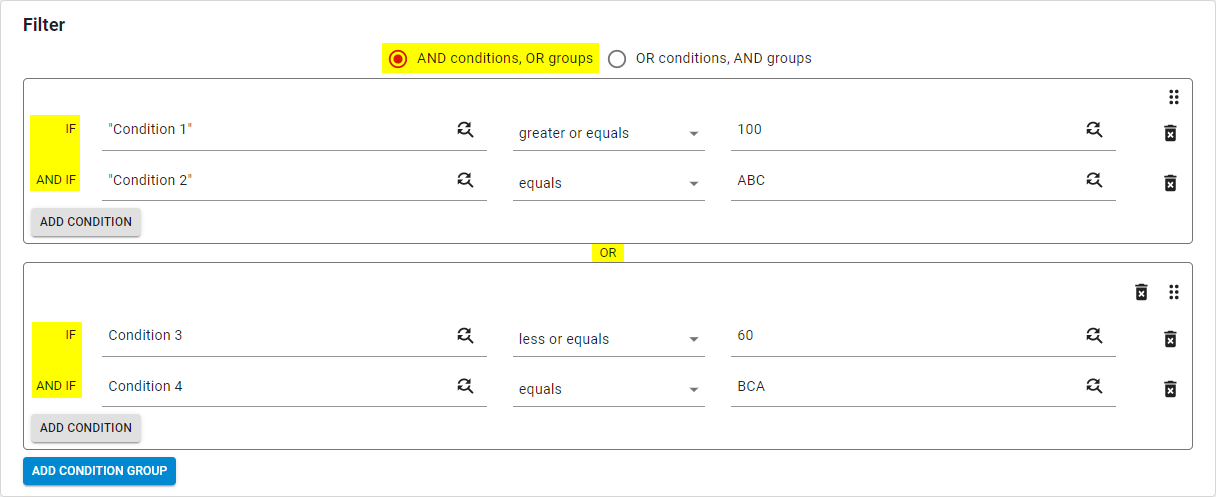
Figure 25: Example showing AND conditions, OR groups
-
OR conditions, AND groups — between groups of conditions the logical operator AND is applied, but the OR operator is applied between conditions within each condition group
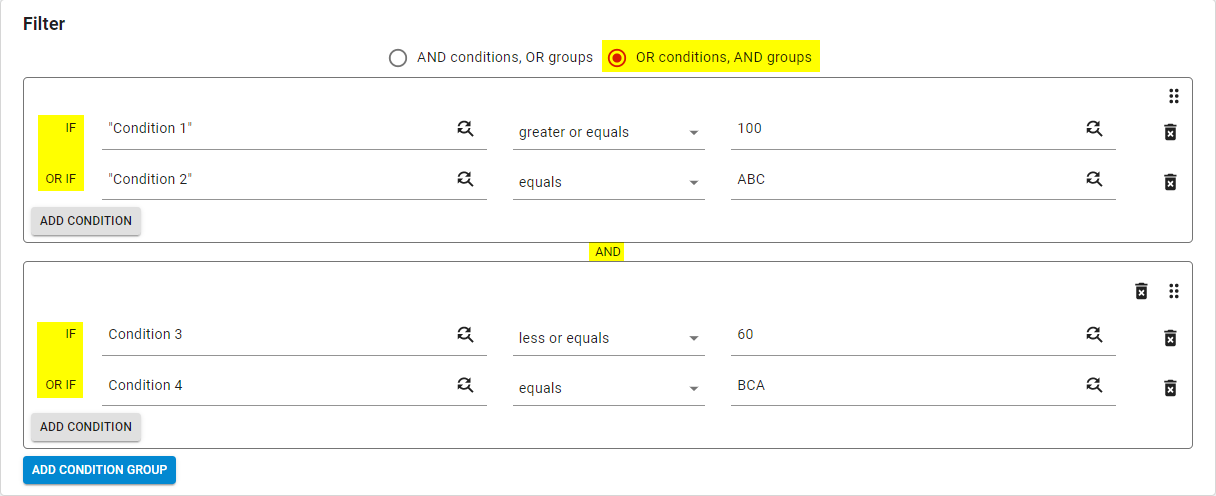
Figure 26: Example showing OR conditions, AND groups
There are no system limitations to the number of groups you can have within a rule. However, Thredd recommends you check the performance of each rule regularly.
7.3 Configuring Rules
This section explains how to add a new group of conditions, delete a group and/or conditions, and edit rule conditions.
Only managers with the appropriate access rights can modify rules, groups and conditions. See User Access Management for further information.
7.3.1 Adding a new group of conditions
To add a new group of conditions:
-
Click Add Condition Group. The new condition group is displayed.
-
To add a condition within the group, click Add Condition. By default, a new empty condition is displayed.
7.3.2 Deleting a group and/or condition
To delete a new group of conditions:
-
Click
 Delete in the right of the Filter pane associated with the appropriate group or condition.
7.3.3 Updating a rule
Changes to existing conditions of rules can be initiated only by managers with the appropriate access rights.
To edit a rule:
-
Click
 Edit in the top right of the screen.
 -
Apply your edits and click
 Save.
Save.
Any changes made to rules appear as change requests on the Thredd side. After the change request is captured on Thredd JIRA, Thredd checks to ensure the requirements of the change match the actual configuration change before publishing the modifications in the production environment.
7.4 About Rule Actions
A rule action is a trigger which is executed immediately after all the conditions of the rule are met. A rule can have a single rule action or multiple rule actions configured. All rule actions are executed in sequential order, as they appear in the Action pane. The order can be changed.
The most commonly used rule actions are:
-
Mark as suspicious: This action marks the event as suspicious and displays it on the Suspicious Transaction Log screen. This is the default action configured for all rules.

Figure 27: Mark as suspicious rule action
Events marked as suspicious by the Thredd Protect rules are displayed on the System marked events/System marked Transactions page in green, until the event is reviewed and the status is changed by a user. After a new status is assigned to an event/transaction by a user, the transaction is moved and displayed on the Operator marked events pages, depending on the status:
-
Operator marked events > Genuine
-
Operator marked events > Investigation
-
Operator marked events > Fraud
-
Operator marked events > Ignore
Transaction colour coding.
-
Highlight: This action highlights an event on the user interface:

Figure 28: Highlight rule action
You can select the colour of the highlighter from a full RGB pallet. The following example shows the difference between a highlighted and a non-highlighted event (the difference between the highlighted action being triggered or not):


Figure 29: Example of a highlighted event
Notify (E-Mail): This action sends an email notification to selected recipients. You can configure the subject of the email and the message text and include any text and/or event attributes as shown below:

Figure 30: Configuring a notify action
Below is an example of an email alert received from Thredd Protect when the Notify (E-Mail) action is triggered:
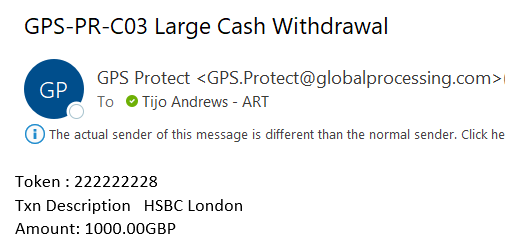
Figure 31: Example of an email notification from Thredd Protect
Call web service: This action blocks a card by changing its status to 05 (Do not honor), 63 (Security Violation) or Thredd specific G5-G8 card statuses. This prevents any further successful transactions on the card.
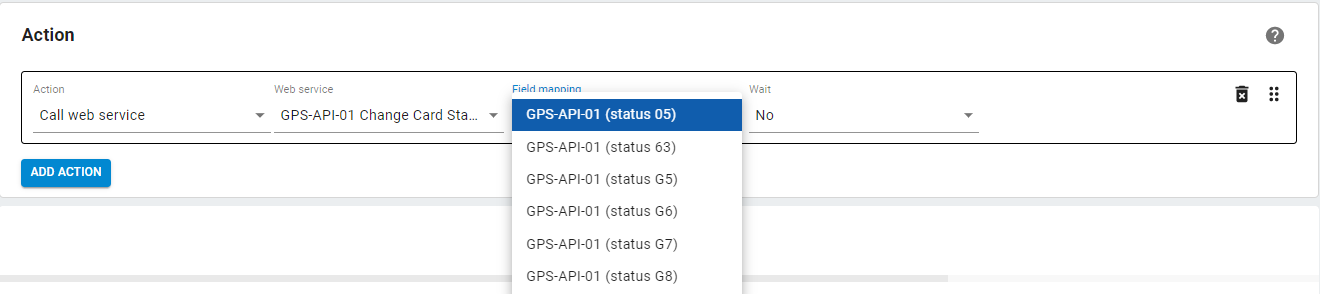
Figure 32: Configuring a Call web service action
-
Add to rule allowlist: This action adds an attribute to a rule’s allowlist for a specific time period. In the example below, the Attribute Token will be allowed (in other words, excluded from the rule triggering) for a period of 60 seconds, as defined in the Expiration time (seconds) field.
-
Add to dataset: This action adds an attribute to an existing dataset for a specific time period. In the example below, the Value of the attribute “Card Acceptor Terminal ID” will be added to any selected dataset for a period of 60 seconds, as defined in the Expiration time (seconds) field.
7.5 Creating an Allowlist for Specific Rules
For each rule, a list of exceptions can be defined for any transaction attributes. Transactions that contain the value defined in the exception list will be ignored by the rule. The allowlist is defined by the transaction attribute value and the Expiration date and time of the allowed attribute/record.
To add an attribute to a specific rule’s allowlist:
-
Click on
 Add new item on the Allowlist pane. The input form appears. The number of records that can be added to the rule allowlist is unlimited.
 Optionally, to delete a record from the list, select it in the list and click
 Delete items.
 -
After making your changes, click
Save. The allowlist is saved together with the rule. When the selected expiration date and time is reached, the card (or any other selected attribute for allowlisting) is automatically removed from the allowlist.
*While every endeavour will be employed to check the rule operates successfully, Thredd cannot and does not take responsibility for any losses incurred as a result of incorrectly configured rules (rules configured with erroneous parameters) or rules not operating as expected.
Notes
-
In some scenarios, a rule may be triggered although transactions are genuine
-
To stop a rule from triggering, you can add a cardholder to the allowlist. The rule will then be ignored
-
Only managers with the appropriate access rights can make changes to the rules and allowlists (see User Access Management for all available user access types)
-
Over 50 different elements can be allowlisted. The most common ones are: Token, MCC, and Country
-
You can only add or modify rules that belong to your institution
-
You can make changes to rules under your institution. Thredd will review* the changes before publishing them in the Production environment
-
If you’re unsure how to build a rule for a specific scenario, use Thredd customer support portal to raise a customer support request.